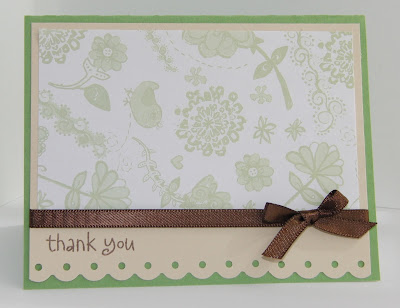
I know I said I had a banner to show you in this post, but I changed my mind! The banner will be in the next one :) It isn't often any more that I make a completely Cricutless project, but recently I have created two thank you cards (one posted here and the other one to come in the future) without my Cricut! I sometimes have a hard time making thank you cards because I can never decide on a cuts to use, unless I have a specific person/purpose in mind. Therefore, it takes me forever when I do make them, so Cricutless tends to be a bit quicker. This one is a card that my sister and I made for her to sell in order to raise money for March of Dimes.
Here's how I did it:* Card Base - 5.5" x 8.5" (scored at 4.25")
* Card Mat - 5.25" x 4.25" (trimmed with Fiskars Treading Water Border Punch)
* Pattern Mat - 5" x 3"
* Offray Brown Ribbon
* Hero Arts Everyday Sayings Stamp Set
* Brown Momento Ink
This card is super simple to make. I chose earth tones to make it more gender neutral (even though it has a bow). I really liked how it turned out and how quick it was to make. I plan to make some more for my stash using other color combinations and pattern papers. I will be back in a few days with a banner I made (my first ever) for a baby shower. *~*Thanks for stopping by*~*
Showing posts with label Cricutless. Show all posts
Showing posts with label Cricutless. Show all posts
A Cricutless Thank You!
Wednesday, April 4, 2012
Simple Masculine Birthday Card
Friday, December 23, 2011
Oh my did the holidays sneak up on me! Things have been super busy in life in general. I apologize (and thank them for not giving up on me) to all of my followers for not having the time to post more often. I do have several Christmas cards/projects to post, so be watching for those soon. Today I am posting a super simple (& Cricutless!) birthday card that I made for my wonderful dad. I don't know about everyone else, but I have a hard time making masculine cards (I think it is my love of all things sparkly that gets in the way!). I got the idea from a Christmas card I saw at Vicki at WizarHd's Hangout.
Materials
* Card Base: 8.5" x 5.5"
* Chocolate Brown Mat: 3.75" x 5" (Paper Studio)
* Light Brown Mat: 3.5" x 4.75" (Creative Memories)
* Orange Polka Dots: 1" x 2.5" (Boxer Paper)
* Green Polka Dots: 1" x 2" (Boxer Paper)
* Blue Polka Dots: 1" x 1.5" (Boxer Paper)
* Scrap White Paper 3" x 2.5"
* Cut Both Mats and glue to the card base.
* Cut each present piece and glue them, stacked on top of each to the scrap white paper.
* Tape the ribbon to the present piece and tie a bow.
* Glue the present to the card
* Stamp Happy Birthday ( from CTMH Celebrations with Momentos ink)
I wish the stamp would have stamped a bit better, but overall I think it turned out really well! I'd love to hear your feed back of course. I hope that everyone has a wonderful Christmas and a Happy New Year's! *~*Thanks for Stopping By*~*
Here's how it is made:
Materials
* Card Base: 8.5" x 5.5"
* Chocolate Brown Mat: 3.75" x 5" (Paper Studio)
* Light Brown Mat: 3.5" x 4.75" (Creative Memories)
* Orange Polka Dots: 1" x 2.5" (Boxer Paper)
* Green Polka Dots: 1" x 2" (Boxer Paper)
* Blue Polka Dots: 1" x 1.5" (Boxer Paper)
* Scrap White Paper 3" x 2.5"
Steps
* Cut the card base and score in half.* Cut Both Mats and glue to the card base.
* Cut each present piece and glue them, stacked on top of each to the scrap white paper.
* Tape the ribbon to the present piece and tie a bow.
* Glue the present to the card
* Stamp Happy Birthday ( from CTMH Celebrations with Momentos ink)
I wish the stamp would have stamped a bit better, but overall I think it turned out really well! I'd love to hear your feed back of course. I hope that everyone has a wonderful Christmas and a Happy New Year's! *~*Thanks for Stopping By*~*
Subscribe to:
Posts (Atom)


